Tel2 SecureVoIP App Setup Guide

Matthew Atkinson
Last Update منذ عام واحد
The SecureVOIP Application is a feature-rich Smartphone Application which can be used to make and receive phone calls on any Tel2 phone or extension number. Available on both Android and iPhone devices, it boasts several powerful features including:
- Encrypted SIP Transport (TLS)
- Video Calling to other Tel2 users
- Attended Transfer
- Blind Transfer
- Contact Integration and Favourites
- BLF/Presence Functionality for Favourites
To download the App to your Smartphone click on the relevant App below:
Apple iPhone: https://apps.apple.com/us/app/id1529360545
Android Phone: https://play.google.com/store/apps/details?id=nz.securevoip.basic
Android Login and Setup Instructions
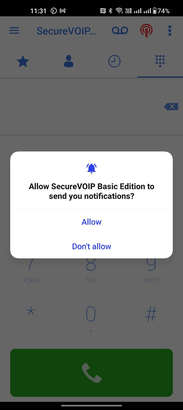
1 - Download the App to your phone and accept any permissions requests such as notifications. Without allowing these permissions the App will not operate correctly.
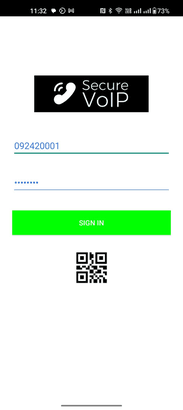
2 - Enter your phone (or extension) number and password
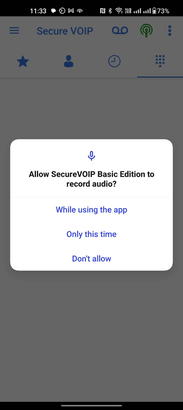
3 - You must allow the SecureVOIP Basic Edition App to record audio whilst using the App otherwise the phone will not work properly
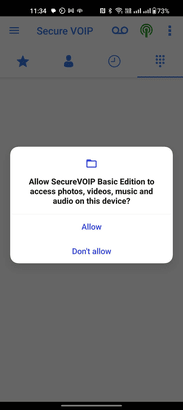
4 - You must also Allow he SecureVOIP Basic Edition App to access photos, videos, music and audio on the device for all the contact integration to work normally
5 - Click on the Contacts tab (2nd icon from the left) and then you must Allow access to your contacts
6 - Click on the timer icon (3rd icon from the left) and then you must allow the App to determine the position of nearby devices for this screen to work fully
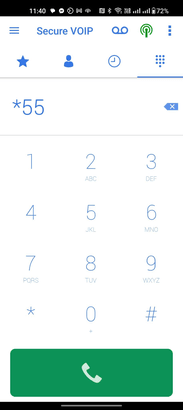
7 - Go back to the 'Dialer' icon screen (icon on the right) and now a dialpad should display. Try dialing '*55' or click the Voicemail icon at the top of the screen to test if the phone is working normally (this will check your voicemail service).
You should now be able to place calls out to any phone number and receive incoming calls to your number. You should also be able to go back into your Contacts tab to dial any number from your phone contacts. Whilst on calls you can also transfer calls to other numbers or extensions.
Click here for instructions on how to perform attended transfers in the app
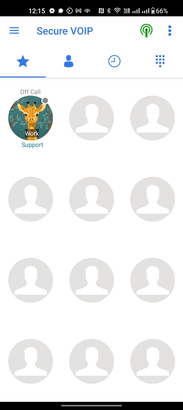
Adding Favourites and enabling BLF (Presence) Monitoring
You can now make and receive calls using the App. However it is usually preferable to then setup a list of 'Favourites' in the page indicated by the 'Star' icon. The best way to add a favourite and enable BLF monitoring is to first create the contact in the Contacts screen as this allows you to setup more details for the user and also assign an icon/image to that favourite.
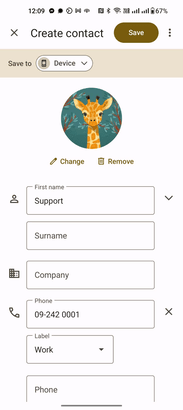
1 - Go to the Contacts screen (2nd icon from the left) and click on the '+' icon in the bottom right corner to add the new contact. If the contact is already in your local phone contacts then you can simply edit the contact by clicking on it.
2 - Enter the First name (and Surname if required) and then the phone number. Please ensure if the contact is a Tel2 number/user that you enter the number exactly as it appears in the Tel2 web portal (e.g. 092420001). If you are adding an extension to your contacts and you want BLF/Presence monitoring to work then you need to ensure that you use the long "Login" number as shown in the Line Manager page rather than the short extension number (e.g. 80100010001). Entering the short extension number will allow basic dialing but not BLF monitoring to work in the favourites page.
3 - You should also add a picture for the contact if it is going to be a favourite to make it stand out by clicking the 'Add picture' icon. You can use a photo of the contact or select 'Illustrations' for a fun icon to use instead. Once the contact is setup you press 'Save'
4 - Now navigate to the Favourites screen (Star icon on left) and hold down your finger on of the Favourite 'slots'. Now click on the + icon at the top right of the screen to search for a contact and search for your contact saved in Step 3 and then select this contact.
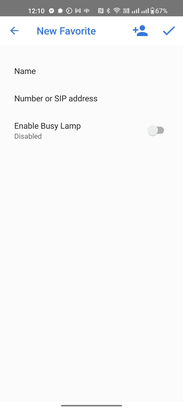
5 - Back in the new favourite screen you will see the selected contact number entered in the 'Number of SIP Address' field. IMPORTANT: You need to ensure that any spaces or hyphen characters are removed from this number field so it is displaying numbers ONLY. Otherwise the BLF Monitoring will not work. This may mean re-entering the number again by editing it (e.g. 092420001).
6 - Finally if the contact is a number or extension is hosted on Tel2's network then you can Enable the Busy Lamp setting by switching this on with the slider. Again see the earlier note in Step 2 on extensions and the need to enter the long Login number for internal Cloud extensions. Click the 'tick box' in the top right corner to save the Favourite.

7 - You should now see the favourite with the selected icon in the favourite slot you chose. Repeat steps 1 to 6 for each contact you wish to setup as a favourite. When a call is made to any of your contacts in the Favourite screen you should see the status change from Off-call to On-call (or Ringing). Pressing any icon in the Favourites screen will simply dial that contact. It will not however pickup a ringing call for that user. Call pickup must be manually by dialing *89 followed by the user extension or number in the dialpad screen.