Cisco SPA5xx and SPA3xx Handset Auto Provisioning Guide

Ray Jackson
Last Update год назад
Tel2 offers auto-provisioning for the legacy Cisco SPA handsets including the popular SPA303, SPA504G, SPA525G and several other models. These phones still work well Tel2's platform however they do need a Custom CA (Certificate Authority) uploaded to the phone to work given that Cisco do not provide any updates anymore to their firmware. Simply login to the Tel2 web portal and go to the 'Phones' page under the Voice tab.
https://portal.tel2.co.uk/voice/phones/
Click on Add a new phone and select 'Cisco' from the Manufacturers list. You will then be shown a list of phones that are supported by our auto-provisioning tool. Select the model of phone you wish to configure and then fill in the details required including the MAC address for the phone. This will be on the back of the phone or can be viewed using the menu keys on the phone or by logging into the handset web interface.
Before you provision any handset you should perform a factory reset of the phone first by using the menu key on the phone and scrolling down until you see the Factory Reset option.
You can then configure which phone accounts you want to provision on the handset and configure the line keys on the phone as required (e.g. BLF keys to monitor other lines etc.).
Please NOTE that with the legacy Cisco SPA handsets that if you wish to have multiple SIP accounts on a phone that you must have a Line Key assigned to each SIP account that you wish to have active. Any 'spare' keys that are not assigned to a SIP Line can then be assigned for other 'extended; functions such as BLF keys or Speed Dials etc.
Once you have saved your new phone configuration - you then need to login to your Cisco handset using the 'admin' user and password (by default this is also admin) and then go to the 'Provisioning' menu option and select the 'Configuration' section.
NOTE : For some factory reset devices, you will not need to log in with a user and password upon entering your phone through a web browser. To access the 'Provisioning' menu, simply click 'Admin Login' then 'advanced' on the top-right area of your screen.
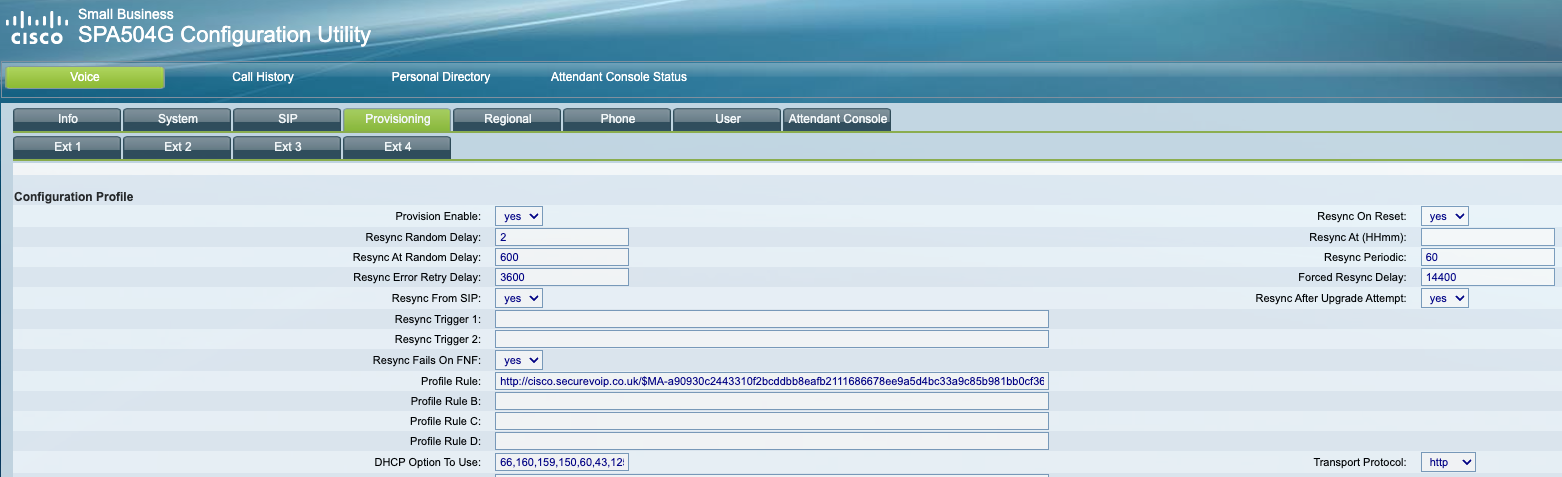
You should then set the following settings in the provision page:
- Provision Enable: Yes
- Profile Rule: http://cisco.securevoip.co.uk/$MA-xxxxxxxxxxxxxxxxxxxxx.cfg
- Transport Protocol: http
- Resync Periodic: 60
You need to copy the Profile rule setting from our phone provisioning web portal. Each account has a private secure key for provisioning and this is what is denoted by the
cisco.securevoip.co.uk/$MA-xxxxxxxxxxxxxxxxxxxxx.cfg part of the Profile URL above. Unfortunately due to the age of these phones a normal HTTPS secure provisioning option will no longer work and so our web servers will check that the connecting device is a valid Cisco SPA phone and the long secure key in the Profile rule which is unique to each account will protect against unauthorised access to configuration files.
The Resync Period is set to 60 to force the phone to update it's configuration file more quickly since these phones can take a while to actually update themselves initially. The Resync can and will be reset back to 1 hour once provisioned.
Then click 'Submit All Changes' and the phone should auto-provision with 60 seconds. You may need to power cycle the phone to get it to download it's configuration from our provisioning server.
If you have any questions about Cisco phone provisioning then please contact our support team and if there is a model missing then please send us a downloaded copy of the configuration so we can see if it can be added easily to the platform.