Polycom Auto Provisioning Guide

Ray Jackson
Last Update hace un año
https://portal.tel2.co.uk/voice/phones/
Click on Add a new phone and select 'Polycom' from the Manufacturers list. You will then be shown a list of Polycom model phones that are supported by our auto-provisioning tool. Select the model of phone you wish to configure and then fill in the details required including the MAC address for the phone. This will be on the back of the phone or the box that the phone came in should also have the MAC address on a sticker attached to the box. You can also find the MAC address through the menu screens on the phone (under Network Settings)
You can then configure which phone accounts you want to provision on the handset and configure the line keys on the phone as required (e.g. BLF keys to monitor other lines etc.).
Once you have saved your new phone configuration - you then need to login to your Polycom handset and determine it's IP address. This is usually done by pressing the Home button, scrolling right to 'Settings' and then select 'Status' and then Network and then 'TCP/IP Parameters'. You should see the IP address listed beside 'IPv4 Addr'. On the same network as the phone then simply browse to the IP address listed to see the web interface.
We recommend first that you Factory Reset the Phone. This can be done through the menu keys on the phone itself or through the web interface.
When you are logged in as 'admin' we recommend first Factory resetting the phone. This is done under the 'Utilities' menu, clicking 'Phone Backup & Restore', and expanding the 'Global Settings' settings and clicking on the 'Restore' button.

NOTE: From Factory Default settings you will not be allowed to login with the default Admin password of '456' and may need to change the Admin Password on the phone.
Do this by going to the Settings page as above and then 'Advanced'.
Enter the default password of '456' and then select 'Administration Settings' and then 'Change Admin Password'.
Enter the existing password of 456 and replace it with something simple like '789' and then save the new password. You will now be able to login to the web interface of the phone using the new password you entered.
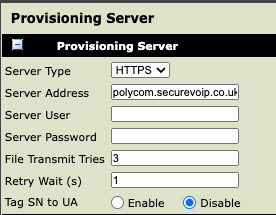
To setup Provisioning then go to the 'Settings' menu option and select 'Provisioning Server'. Then enter:
Server Type: HTTPS
Server Address: polycom.securevoip.co.uk
You do not need to change any other settings. Simply Click 'Save' and the phone should automatically configure itself from our provisioning servers.
If you have any questions about Polycom phone provisioning then please contact our support team.