Panasonic SIP Phone Auto-Provisioning Guide

Ray Jackson
Last Update vor 9 Monaten
Tel2 offers auto-provisioning for several models of Panasonic SIP compliant handsets including the popular KX-HDV, KX-UT, KX-TGP, KX-TPA and KX-HGT models. Please note than Panasonic make many other IP phones such as the KX-NT series that are proprietary and so will only work with Panasonic Phone Systems so these will not work on Tel2.
Step 1 - Access the Phone Web interface
The first thing you will need to do is get web access to the phone. Firstly make sure you are on the same network as your phone and that your phone's ethernet port is plugged into your network router or switch. By default web access is disabled on Panasonic phones and needs to be enabled using the Menu key on the handset.
For most model phones this is done by pressing Menu button on the phone and then:
- System Settings
- Network Settings
- Embedded Web
- Change to "On" and hit OK
- Change to "On" and hit OK
- Embedded Web
- Network Settings
Once the web access has been enabled you need to identify the current IP address of the phone and for most model phones this is done by pressing Menu button on the phone and then:
- System Settings
- Status
- IPv4 Settings
- IP Address
- IP Address
- IPv4 Settings
- Status
You should now be presented with a login window. The default password is:
- Username: admin
- Password: adminpass
Hopefully now you are logged into the web interface of the phone.
Step 2 - Factory Reset the handset
Before you provision any handset you should perform a factory reset of the phone. This is done by clicking on the Maintenance tab and then selecting 'Reset to Defaults' on the left side menu. Next simply click the 'Reset to Carrier Defaults' button and confirm.
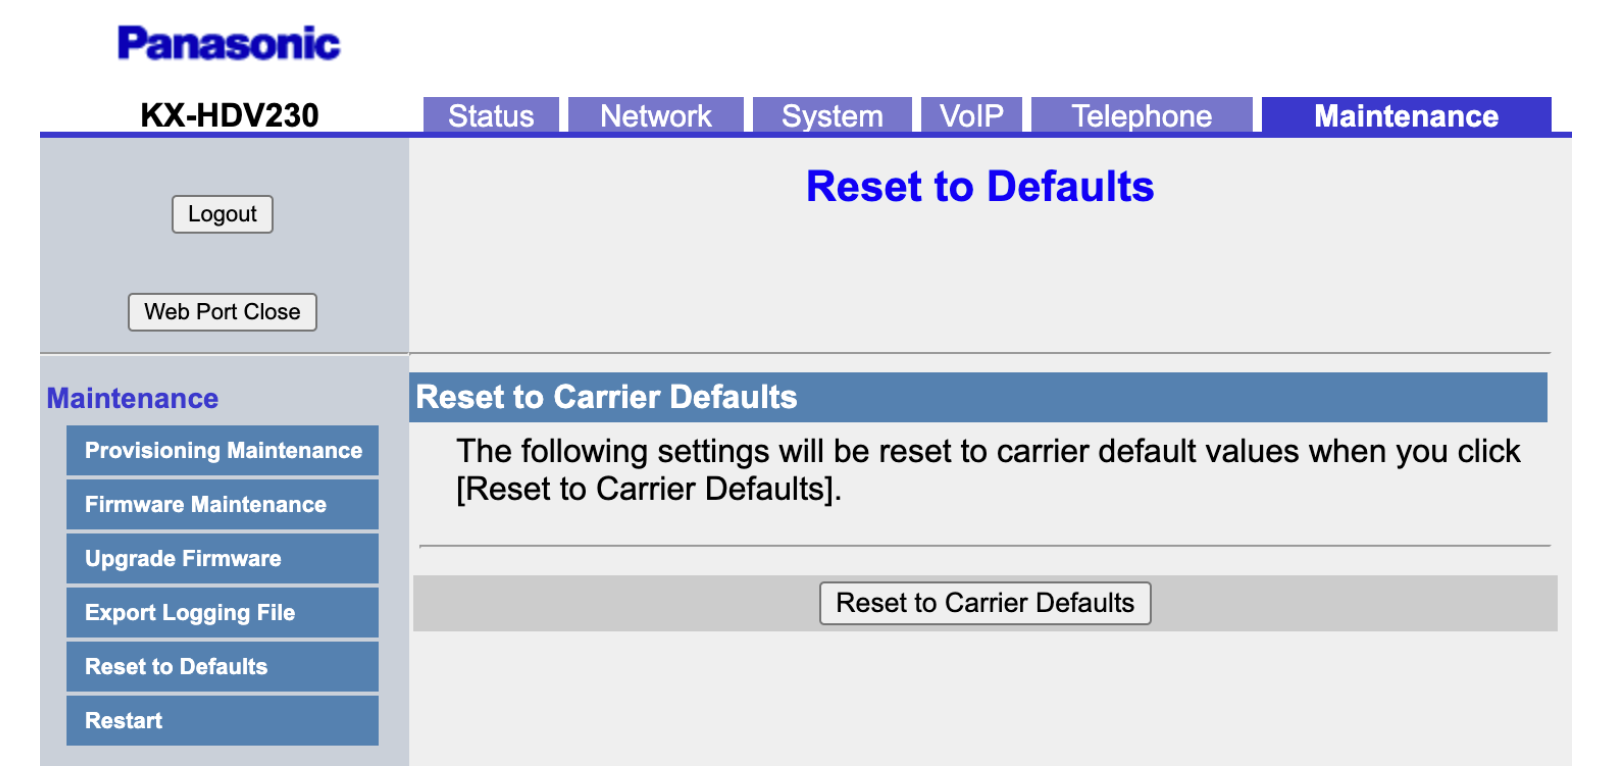
The phone will shortly after this restart with all settings wiped.
NOTE: Now repeat Step 1 again above to gain access back to the web interface of the phone again before moving on to Step 3.
Step 3 - Setup your phone in the Tel2 Portal
To auto-provision your Panasonic SIP phone simply login to the Tel2 web portal and go to the 'Phones' page under the Voice tab.
https://portal.tel2.co.uk/voice/phones/
Click on Add a new phone and select 'Panasonic' from the Manufacturers list. You will then be shown a list of phones that are supported by our auto-provisioning tool. Select the model of phone you wish to configure and then fill in the details required including the MAC address for the phone. This will be on the back of the phone or can be viewed using the menu keys on the phone or by looking under the 'Status/Network Status' page in the web interface of the phone.
Now take a note of the "Maintenance / Standard File URL" setting displayed under the 'Phone Type' field in the provisioning page. The setting will look something like:
https://panasonic.securevoip.co.uk/{MAC}-xxxxxxxxxxxxxxxx.cfg
The 'xxx' part of the URL will be a long secret and unique key specific to your account. You will need this later in Step 4 to provision the phone.
Next configure which phone accounts you want to provision on the handset and configure the line keys on the phone as required (e.g. BLF keys to monitor other lines and Speed Dials etc.).
Once you have configured the phone as you want it press 'Update Phone Details' and within a few seconds a configuration file will be generated.
Step 4 - Enter the Provisioning URL into the handset
Now go to the web interface of your Panasonic phone and click on the 'Maintenance' tab at the top and then the 'Provisioning Maintenance' page. You will see a field labelled 'Standard File URL'. You need to paste the link from Step 3 into this field (overwriting any existing setting) as shown in the screenshot below:
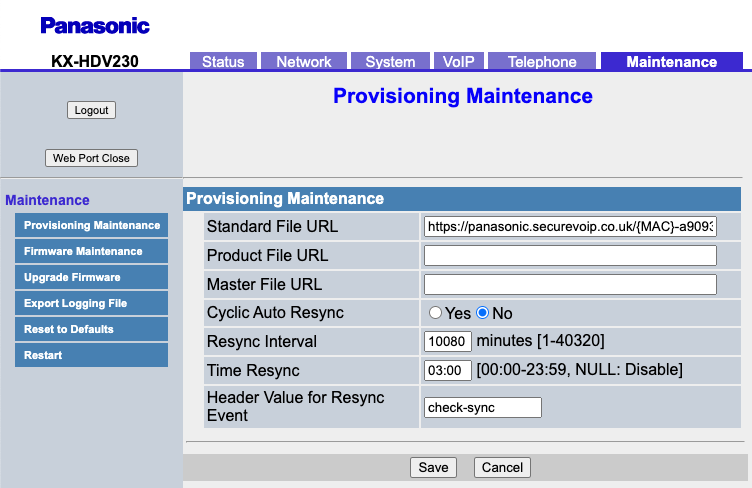
You may seem some existing links in the Product File and Master File URL fields. You can delete these or just leave them as they are. Our provisioning system should overwrite these.
Now press 'Save' and check the save is Committed successfully.
Step 5 - Restart the phone and then wait for provisioning
Finally, go to the 'Restart' page on the left menu in the Maintenance tab and then click the Restart button and confirm the operation.
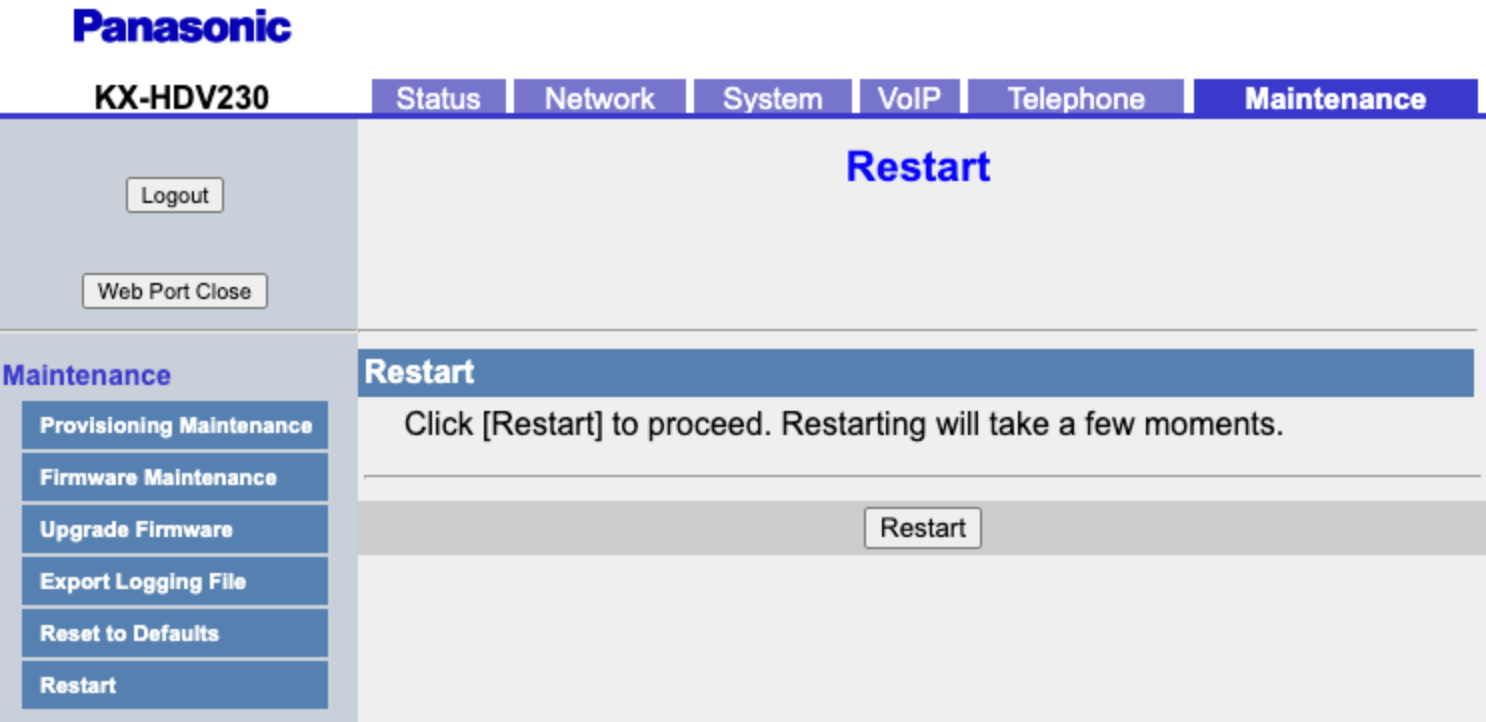
In a few seconds your phone should restart and then download its configuration file from our provisioning servers and your phone will be ready to use. Please be patient as it can take several minutes for your phone to provision itself even after it appears to have rebooted.
If you have any questions about Panasonic phone provisioning then please contact our support team and if there is a model missing then please send us a downloaded copy of the configuration so we can see if it can be added easily to the platform.